Login Form

Q1 Plans Chapter 2 Page 2-1

BILL OF MATERIALS

     Upon receiving your Quickie kit, you should immediately match the packing list in each box against the actual contents of each box. Any descrepancies should be reported immediately to the appropriate vendor(e.g. Aircraft Spruce, etc.) We can not be responsible for shortages that go unreported for longer than 5 days after receipt of the materials.
     QAC maintains a close liaison with Quickie subcontractors to assure proper materials specification and quality control. Do not make substitutions for the materials provided. The materials provided were selected, developed, tested, and optimized for ease of construction and structural integrity. If you insist on making non-approved substitutions for replacement and spoilage, we insist that you do not call your aircraft a Quickie. QAC will not provide assistance in the application of substitute materials or components.
     In addition to the materials provided in the kit, you will have to furnish a few ltems that are readily available locally. We do this to save you some money. These items are as follows:

  • 2" x 2" piece of aluminum screen door screen.
  • 10" length of l/4" diam. wood dowell material.
  • Masonite or aircraft quality plywood for templates.
  • Lumber for a workbench and jigging.
  • Finishing Materials; Dupont 70S dark gray laquer primer surfacer, Acrylic laquer paint ln the color of your choice(see Chapter 19), and Silicon Carbide or Aluminum Oxide type sandpaper in Coarse (36,40, or 60), medium (100 to 150), and fine (220 to 320).

     Tools required are covered in the Education section (Chapter 3).


     The QUICKIE kit, properly constructed, will reproduce the successful original OUICKIE designed, made, and tested by QUICKIE AIRCRAFT CORPORATION. OUICKIE AIRCRAFT CORPORATION is not responsible, and makes no warranties, express or implied whatsoever, regarding the struc- tural integrity, performance, flight characteristics, or safety of the Buyer's completed air- craft and its component parts. OUICKIE AIRCRAFT CORPORATION has no control and assumes no control over the Buyer's ability to successfully construct and test the QUICKIE AIRCRAFT. Buyer expressly waives any and all claims arising from structural integrity, performance, flight characteristics, mechanical failures, and safety against QUICKIE AIRCRAFT CORPORATION. Buyer acknowledges awareness of the risks of flying a home built aircraft. Buyer acknowledges that the FAA must inspect the aircraft at construction intervals, as well as the completed project, prior to flight, and should work with his local FAA representative regarding the construction and licensing of the aircraft.

     QUICKIE AIRCRAFT CORPORATION reserves the right to make recommended revisions in the plans and construction of the aircraft at any time without liability to QUICKIE AIRCRAFT CO PORATION, as such revisions or changes may he deemed advisable from time to time.

Q1 Plans Chapter 3 Page 3-1

Quickie Plans EZE Tech

CHAPTER 3

EDUCATION

DON'T SKIP THIS SECTION. Every hour you spend in this preparation section will save you five when you really start building your aircraft.

GENERAL

In this section you won’t build any part of your airplane. What you will do is learn how to build your airplane the right way. This construction technique is radically different from anything you’ve done before (including building boats, surfboards, airplanes, and gocarts), and you should assume there is only one correct way to do it. We’ve discovered lots and lots of wrong ways of doing things and have written the plans to keep you from repeating our mistakes. We insist that you do things our way. If you have a better idea, suggest it to us, we’ll test, and if it really is a better idea we’ll publish details in the QUICKIE NEWSLETTER

This section will teach you all of the techniques required to build your airplane, show you what special tools you need and how to use them. The educational samples that you will build in this section are designed to give you experience and confidence in all of the techniques that you will use in the construction of your airplane. The steps in construction of each sample are arranged in sequence (as are the steps in construction of the actual aircraft parts) and you should follow the sequence without skipping any steps. You will learn the basic glass layup technique used throughout the aircraft, special corner treatments, foam shaping, cutting, and joining methods. A summary of these techniques is provided on yellow paper for you to tack up on your shop wall.

TOOLS

There are certain tools which are necessary to complete the aircraft. Three lists of tools are provided here. The first is the absolute bare minimum required, sacrificing efficiency; the second is a recommended list for the best compromise of cost and work efficiency; the third is a list for the “Cadillac” of shops where ease of construction is more important than money. The non-common items are stocked by the Quickie distributors.

  1. Basic Required Tools

    Common Household Butcher Knife
    Coping Saw
    1/4" Drive Socket Set
    Small Open End Wrenches
    Sandpaper 36-grit carborundum Aloxite Fastcut (50 sheets), also 220-grit and 320-grit wet or dry silicon carbide (20 sheets each)
    Pliers
    1" putty knife
    Hacksaw
    Blade & phillips screwdriver
    Box of single-edge razor blades
    24" carpenter's square
    Felt Marking Pens
    3-ft straightedge
    100 eight-oz paper cups (Lily 8SN1)
    50 3-oz paper cups (unwaxed)
    12-ft decimal steel tape (Stanley 461-112)
    1/4" drill with #30, #32, #10, 1/4" and #12 bits
    #10-32 & 1/8" NPT TAPS
    Roll of grey duct tape
    1" paint brushes (25)
    6" plastic or rubber squeegee
    Scissors
    Wire Brush
    Pop Rivet Puller
    Homemade balance for ratioing epoxy
    Wall thermometer 50 to 100° F
    1/4" hand drill

  2. Recommended Tools (in addition to those above.)

    Dremel-type miniature high-speed hand grinder with saw and router bits.
    6” to 9” disc-type hand sander
    Set of 1/4”, 1/2” & 1” chisels (wood)
    Small set of X-Acto knives
    Stipple rollers
    1/2”-dia 100° counter sink (piloted)
    6” machinist steel ruler
    X-Acto ragor saw
    Box of wood tongue depressors to mix epoxy
    6 ft straightedge
    Cheap holesaw set or flycutter
    3/8" variable-speed hand drill
    12" long drill bits - #10 & 1/4"
    Hand broom/brush
    Large commercial 12" scissors (Wiss #20W)
    Sabersaw
    Bench-mounted belt sander
    Stanley surform plane
    Square & half round file
    Several 6" C-clamps
    Vacuum cleaner (shop type)
    10" 18 tooth/inch handsaw (see sketch)
    Quickie handsaw


    Approx 150 lb of small weights *

    * Weights are used to hold various parts down while epoxy cures. They’re bear in 5 to 15—lb pieces. The items in the photo work great. We got them for 5¢/lb at a local scrap yard. Sand filled milk cartons also work well.
    Quickie Weights
  3. For the First Class Shop (in addition to those above)

    Drill Press
    18-inch bandsaw
    Vernier Caliper
    Epoxy ratio pump (Michael Engineering Dispenser)
    90° drill adapter
    Air compressor with blow nozzle
    Orbital Sander
    3/8" & 1/2" spotface

  4. Items Used Only Occasionally & Can Be Borrowed

    Nicopress sleeve tool
    1 dozen 1/8" Clecos
    Hotwire voltage control


The following tools are ones you make:

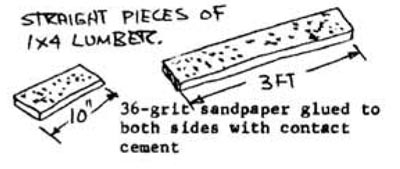
Sanding Blocks

These are required in many areas during construction and for finishing. You may also use a “soft block,” which is a block of the blue styrofoam wrapped with sandpaper.


Quickie Sanding Boards

Alot of elbow grease is saved if you replace the sandpaper often.

Long Straightedge

This is not absolutely required, but is quite handy when jigging or checking the straightness of flying surfaces. it is merely a 6-ft or 8—ft lx3 or 1x4 piece of lumber that is hand-selected to be “eyeball straight.” You can get it one of two ways: (1) Order it from Aircraft Spruce or Wicks - they plane them perfect from dry lumber. (2) Sort through the lumber (dry fir or redwood) at your local lumber yard until you find one that looks straight when you eyeball it from one end. Mark it and hang it on the wall so it doesn’t end up as part of a shelf!

Epoxy Balance

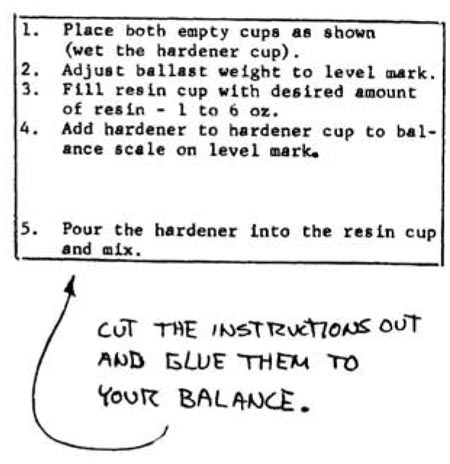
Devices which automatically ratio the correct amount of resin and hardener and dispense it with the pull of a lever are available from VariEZE distributors for approximately $130. These save time and epoxy. You can ratio the epoxy the way we did in building N7EZ and N4EZ by building the following simple balance; Cut out the 5-step instructions and glue to your balance - don’t skip steps! Follow each step exactly every time you mix epoxy.


Quickie Balance On Next Page

Quickie Balance Instructions