Q1 Plans Chapter 3 Page 3-14
- Details
- Category: Quickie Plans
- Published: Thursday, 06 November 2008 00:00
- Written by Dan Yager
- Hits: 6013
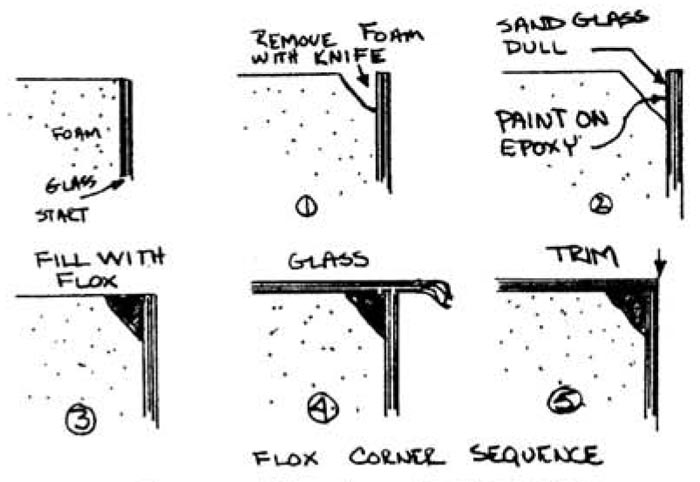
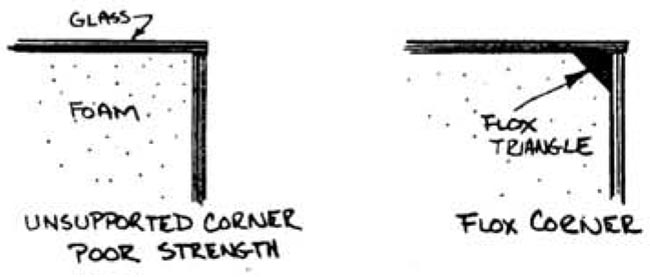
If a specific size of flox corner is desirable, an approximate dimension may be given as shown. Don’t make your flox corners square. The extra flox only adds weight, not strength.
PEEL PLY
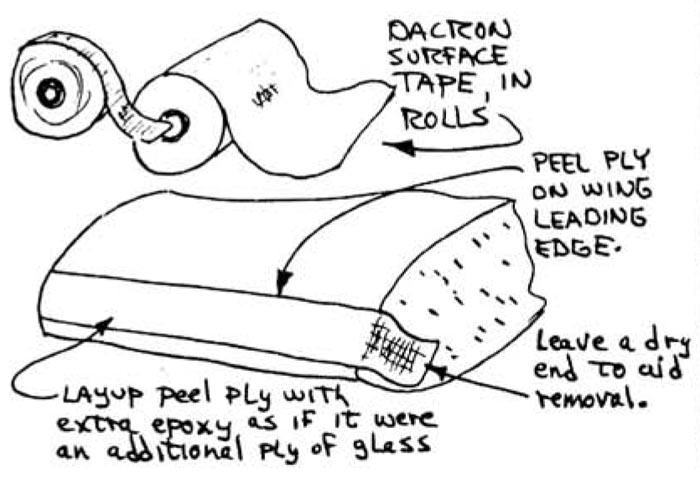
Peel ply is a layer of 2.7 oz. dacron fabric which is layed up over a fiberglass layup while the fiberglass is still wet, and is later removed oy lifting an edge and “peeling” it off. The most convienient form of dacron to use is “surface tapes”, normally used in covering fabric aircraft. These are available in rolls. You will need at least one roll, 2" wide.
Peel ply is used for two purposes:
(1) Peel ply any area that will later be structurally attached to another fiberglass layup. Once the dacron is peeled off the surface is ready for another layup, without sanding. If you do not use peel ply you will have to sand the surface completely dull (no shiny spots). This sanding is hard, itchy work and ruins the strength of the outer ply of fiberglass.
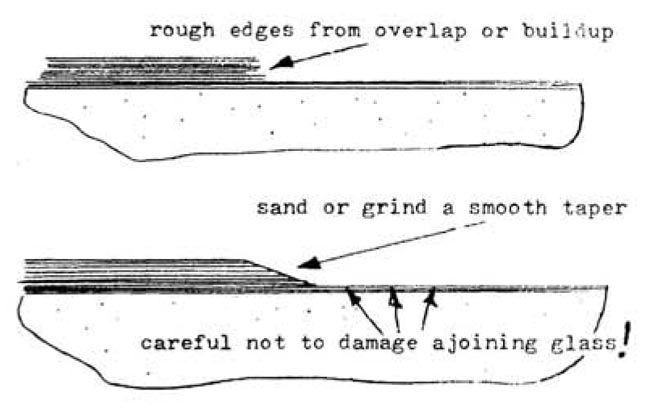
(2) The second use for peel ply is to transition the ares where the top ply of a layup terminates on the fiberglass surface.
Refer to the adjacent sketches. If the top ply edge is laid up bare it results in a rough edge that can delaminate if a little dry. Sanding the rough edge is hard, itchy work and usually results in damaging the adjacent surface. If the edge is overlaid with s strip of dacron during the layup (lay on the dacron & wet out by stippling or squeegeeing) it will make the edge lay down flat and will form a wedge of epoxy to smoothly transition the edge. After cure, peel off the dacron. The result is a beautifully transitioned smooth edge with no delamination tendency. Use this method in all pieces where a cloth edge terminates on the surface.
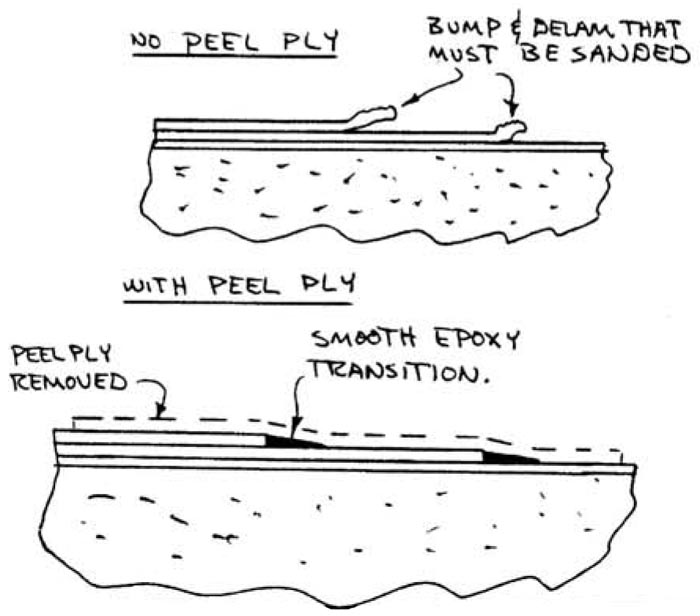
Note that to peel ply the trailing edge overlap ares, the peel ply is the First ply reds to the foam core. Lay a strip ot dacron down on the overlap notch & secure it with tacks or staples so it dosen’t sove when you leyup the skin.
Skin Protection
it you work with epoxy on your bare skin, you can develop an allergy to it. This “sensitization” to epoxy is an unpleasant experience and is to be avoided. You generally have to get epoxy on your unprotected skin to become sensitized. If you use a protective barrier skin cream like Ply No.9 (available from Quickie distributors) or disposable plastic medical examination gloves (also available from Quickie distributors) the allergy can be avoided. The barrier skin cream also allows you to clean up with soap and water after a layup.
The RA epoxy systems are low toxicity (SPI=2). However, msny people (about 5 to 7 percent) are sensitive to epoxy to a grest extent and thus will find it impossible to build their airplane without extensive skin rash, facial swelling, etc. These people can get some help by using doctor prescriued anti-allergy medicines and/or by using elaborate masks/multi—gloves, etc, to reduce exposure, however in many cases the allergy is sufficiently strong to preclude their ability to make layups. Remember to Always use skin protection, never let epoxy come in contact with bare skin, even if you have no reaction to it. Sensitivity is accumulative, such that you may later develop an allergy unless you protect your skin.
Dust Protection
Sanding or grinding fiberglass and foams creates dust that can be harmful to your lungs. Use a dust respirator mask for these operations. Disposable dust masks are availaole at most paint stores.


