Q1 Plans Chapter 20 Page 20-7
- Details
- Category: Quickie Plans
- Published: Thursday, 05 June 2008 01:00
- Written by Jun Su
- Hits: 3674
MOUNTING THE WHEEL
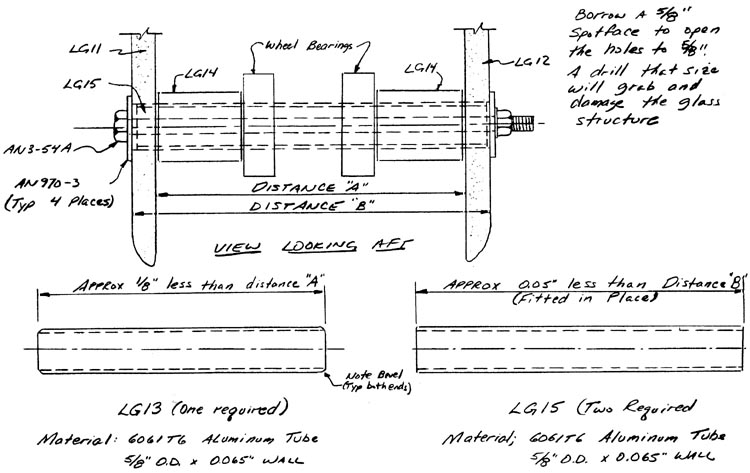
Begin by mounting the tires on the wheels. Open up the 1/4” axle pilot holes in the wheel pants to 5/8” diameter.
The following procedure and sketches are for the left wheel, but the right wheel is a mirror image.
Make LG13 and LG15 after carefully measuring the appropriate distances off of the wheel pant. The LG14 spacers are made out of 6061T6 Aluminum tubing of 7/8” O.D. and 0.125” wall. The LG14—bearing—bearing—LG14 combination length should be about 0.02” less than Distance “A”. If the spacers are too short, the wheel will wobble; if the spacers are too long, the bearings will clamp up and cause extra drag on the wheels. By inserting LG13 through the pieces to keep them in the proper position, you can slide the assembly up into the proper position inside the wheel pant. Next, slide and push LG15 from left to right slowly, pushing LGI3 out the other side of LG12. When LG15 is resting between LG11 and LG12, center the AN970—3 washers on the holes and insert the AN3-54A Bolt. The bolt must be tightened until it clamps up the LG14 spacers against the bearings. If LG15 is too long, it will prevent the clamping effect; if the LG14 spacers are too short, they won’t clamp up either. Therefore, you will have to do some trial and fitting to make things come out right. In the future, whenever you want to remove the wheel, use the LG13 piece, just reversing the above procedure.

INSTALLING THE TAILWHEEL ASSEMBLY
Page 8-5 of the Quickie Construction Plans can be used as a guide. Some parts are new, however. QTW5 fork replaces the QTW2 fork, and includes CS24 as an integral part. A larger tailwheel is used, and this requires the QTWM2 spacer to be used, instead of the QTWM1 spacer. The tailspring must be shortened 2.5” from the stock length.
These changes update page 8-5 for the installation of the new components.
ELEVATOR - WHEEL PANT FAIRINGS
You currently have a large gap between the elevator and the wheelpant. Fill it by carving a block of blue or green foam to shape and glassing two plies over it, lapping up on the wheelpant and the face of CS19. Since the elevator will be at about -5 deg. (T.E. up) at cruise, you may want to set the elevator in that position before carving.
POST-CURING THE CANARD
In order to prevent the canard from creeping because of the weight on it, it should be post cured before it is mounted on the fuselage.
Creeping is when the epoxy deforms because of heat and load. It can be minimized by heating the glass above the highest temperature that the glass will see in operation. If you were a multi-million dollar company, you would use a very large oven; however, painting the canard black with primer and setting it in bright sun will accomplish the same thing.
If you desire, you may want to skip to the finishing section and put the smooth finish on the canard before priming it. However, if you would prefer to do all of the finishing work on the aircraft at one time, you can just shoot some black primer on it and then clean it off later.
Black is used because it absorbs more heat and therefore gets the glass hotter. Expose the top and bottom of the canard to the sun. Check the temperature by placing the palm of your hand on several locations. If you can hold your hand on the surface for about 5 seconds, the temperature is right. Let the canard set like that for about 10 minutes. Do not let it get too hot.


