Login Form

Q1 Plans Chapter 14 Page 14-6

FRONT COCKPIT COVER

The first step toward installing the canopy is to make the front cockpit cover. This cover is heat formed similarly to what you did on the fuel tank and seat-back bulkhead.

The cover extends from the forward face of the firewall to STA58(initially). Use the firewall and the instrument panel bulkhead to aid in contouring the cover.

Begin by temporarily installing instrument panel bulkhead at STA37.5 with dabs of Bondo. Next, rough cut a piece of orange foam and begin heat forming it to the required shape. Go slow, and check for dips and bumps often. When you have it formed, Bondo it in place to the fuselage at the longerons. Next, layup 2 BID at 45 deg. to BL00 on the top of the cover. Using tape to wrap around the longeron and fuselage sides will facillitate keeping the epoxy off of the fuselage. Knife trim the glass even with the longerons.

After the layup has cured, remove the cover from the fuselage and layup one BID on the inside face. Let the layup become very tacky, and then put it back on the fuselage so that it will cure in the proper position. If the cloth is not tacky, the glass will fall off of the foam when it is upside down. Check the layup often.

The instrument panel bulkhead is mounted to the front cockpit cover with one BID tape front and back.
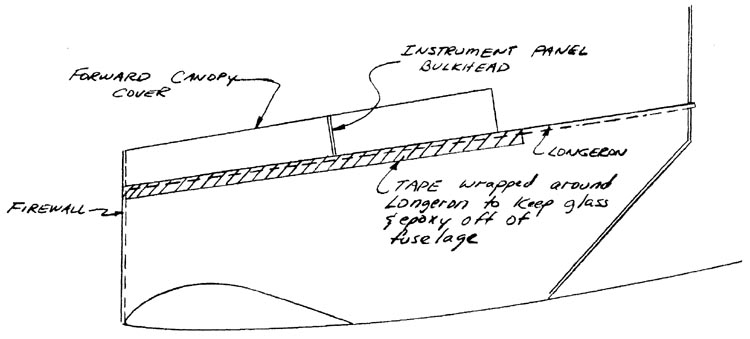
Quickie Front Cockpit Cover Detail


MAIN WING-FUSELAGE COVER

Once the main wing has been mounted to the fuselage, and the aileron control system permanently installed, and the canopy mounted, the main wing-fuselage cover can be formed and installed.

The material used is the orange foam. You will probably find it easier to make the top in two pieces: one piece from the canopy to the FS89 bulkhead, and the second piece from the FS89 bulkhead to the FS110 bulkhead.

The foam is formed using the bulkheads as well as using the contouring of the existing fuselage, in order to come up with a shape that is pleasing.

Once the shape is developed, layup one BID on the inside face of the cover. Let it become tacky, so that it won’t fall off if turned over, and then position the wing-fuselage cover on the fuselage. You may either use some Bondo to hold the cover in place, or you may go right ahead and layup one BID over the outside face using a typical 1” overlap. Use dry micro before the layup to fill the voids around the joints.

Make sure that you don’t get epoxy on the aileron system.
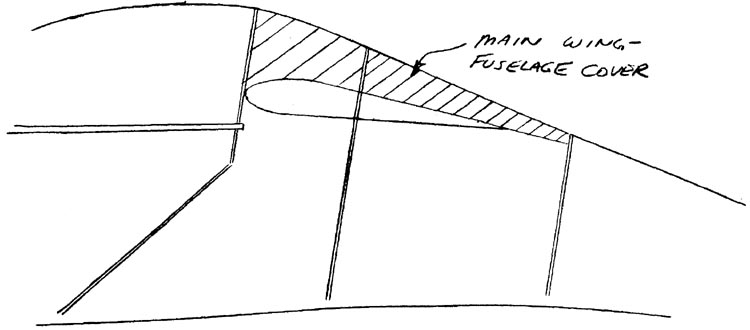
Quickie Main Wing Fuselage Cover Detail


END OF CHAPTER

Q1 Plans Chapter 15 Page 15-1

THE CANOPY

The canopy is sent to you molded to shape. It is crated to protect it from scratches during shipment. We suggest that you protect your canopy from scratches by spraying or brushing on a “peel coat”* or by taping paper or plastic over it for protection while you are building the frame and while you paint the aircraft. Leave this peel coat in place except where you need to remove it to lay down grey tape or lay up glass. When your canopy is complete and the airplane is painted, this coating will peel off easily.

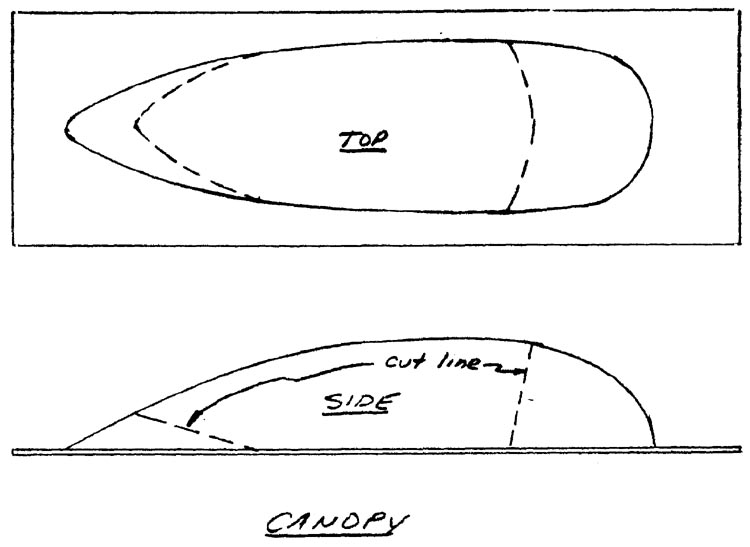
Quickie Canopy

Trim the canopy plexiglass along the premarked lines provided. A band saw, an abrasive cutoff disc in a hand held grinder or skill saw, or a saber saw, will do the job, but in any case, go slow or you’ll ruin your whole day (not to mention your canopy). We've found that the abrasive disc is the easier method. Another excellent tool is the number 406 steel saw blade (about 1” diam. disc) that’s available as an accessory for your dremel hand grinder.

Laying down a layer of grey tape on both sides of the cut line will not only help guide you, but also help minimize breakage.

Remove all nicks from the plexiglass edges with a file. Polish the edges with 320 grit sandpaper. Nicks or scratches can start cracks in the plexiglass.

Next, make the aft canopy bulkhead, and locate the left side and right side canopy stiffeners that you made back in the fuselage section.

The canopy must be fit to your aircraft. You will find that you have to fit and trim several times before you are satisfied. Read over this entire chapter before preceeding to understand what it is you are trying to accomplish. Basically, the tighter that the canopy fits the fuselage, the more airtight and attractive it will be.

Fitting the Quickie Canopy

Bondo the forward fuselage cover to the forward fuselage. (Several dabs)

Lay three layers of grey duct tape along each longeron from the seatback bulkhead to the instrument panel bulkhead on the right side, and 4” forward of the aft edge of the forward fuselage cover on the left side.

What you will do next is to jig the Aft Canopy Bulkhead and the two canopy stiffeners in position on the fuselage. You will then do the final fitting and trimming of the canopy on the fuselage, and then permanently mount the canopy to the stiffeners, the Aft Canopy Bulkhead, and the front cockpit cover.

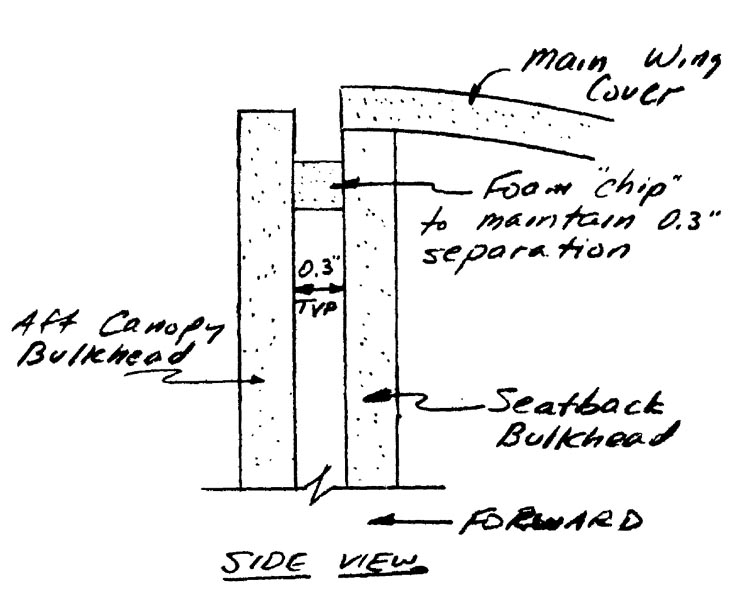
The Aft Canopy Bulkhead is located 0.3” forward of the top of the seatback bulkhead. This is to allow for the later installation of an aft canopy seal. Several foam chips can be used to space the bulkhead out.

Quickie Canopy Aft Bulkhead Alignment

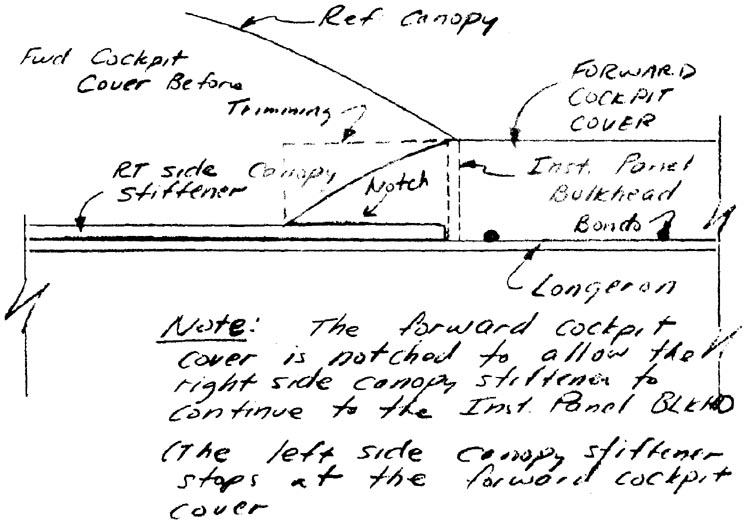
The right side canopy stiffener extends all the way forward to the instrument panel. The left side canopy stiffener extends forward to the rear edge of the forward cockpit cover. These stiffeners rest on the grey tape that you previously place on the longerons. Note that the right side canopy stiffener requires a notch in the forward cockpit cover so that it can pass forward. Use Bondo or five-minute dabs to join the stiffeners to the aft canopy bulkhead and the front cockpit cover.

* For “peel coat”, you can use Spraylat “A”
you need about 1 qt. - Cowley, Inc.
Bldg 170, Mojave Airport, Mojave, CA 93501
805-824-2368