Q2 Plans Chapter 9 Page 9-03

- Details
- Category: Q-2/Q-200 Plans
- Published: Monday, 22 May 2006 09:05
- Written by Quickie Aircraft Corporation
- Hits: 4551
|
..... Now begin to trial fit the four main wing cores into position. Be careful not to put too much pressurl on the foam cores and damage them. The two 4nboard cores will have to be beveled at BLOO by sanding because of the main wing dihedral and the other core joints may have to be sanded to make the cores fit witl in the maximum tolerance of 1/16". The level lines on all cores must remain level at all times. This is important, so take your time. .....Stand back and sight spanwise along the main wing to verify that the main wing is straight, and is not bowed or kinked. Verify that the leading edge is straight from each tip to BLOO, and that the trailing edge is straight from tip to tip. .....Don't be concerned if the main wing core female jigging templates need to be moved inboard or outboard to remove any bows or kinks. Also, a long straight edge will help you looking for kinks and joggles. .....When everything is perfect, mix up some bondo and carefully bondo the main wing core female jigging templates to the table top in the necessary locations. Next, rest the main wing foam cores on the main wing core female jigging templates. Check the alignment and individual level lines again. Then RECHECK the alignment and the individual level lines. Then RE-RECHECK them again; get the message? Stirring sticks, scrap wood, etc. can be used as shims to locate everything properly. .....The next step is to join the foam cores together with micro slurry after verifying that the core-fit is withi n 1/16". Check, recheck, and re-recheck each corE level line and alignment as the cores are joined. Finally, attach the main wing foam cores to the main wing core female jigging templates with small dabs of 5-MIN, being careful not to move the cores after the final level line and alignment check.
TRIMMING THE MAIN WING FOAM CORES
..... When the main wing is attached to the fuselage, it must fit between the FS78 bulkhead and the FS94 bulkhead. As can be seen from the sketch, this requires that the forward "nose" of the main wing cores be removed. You may wish to skip ahead and read the section on MAIN WING MOUNTING to have a clear understanding how the mating is accomplished. .....Go to your fuselage which is laying in the corner and sit in it. This "cockpit time" will help give you confidence that you really can build an aircraft. Don't forget to make airplane engine noises and move the imaginary controls; it helps with the illusion. .....When you are tired of this, get out of the cockpit and measure the distance on your aircraft from the aft face of the FS78 bulkhead to the forward face of the FS94 bulkhead. Make these two measurements at WL30, outboard at either fuselage side at the FS78 bulkhead. They should be the same - about 16.3". since you are only human, they will probably each be a little different, end either more, or less, than 16.3". Also measure the width between the two points that you took the measurements at. .....You are now ready to transfer the information onto the main wing foam cores with a felt tipped marker pen. Using the main wing shear web and the BL00 foam core joint as the reference mark the two points on the foam cores, and connect them with a line. That line should represent where the FS78 bulkhead will meet the main wing core. Verify by making measurements that this line intersects the main wing leading edge inside the fuselage once the main wing has been mounted. If it doesn't, then you will have to taper and round the main wing core area outside the fuselage sides to avoid an ugly looking flat spot on your main wing. Next, move the line aft about 0.10" to allow for the glass buildup as you lamiminate the main wing skins and spar caps. This second line on the main wing cores is the trim line.
SHOULDER HARNESS INSERT INSTALLATION
..... Each shoulder harness is installed in a Y fashion to the lower main wing. Prior to glassing the bottom of the main wing, the shoulder harness inserts (2) must be installed. .....Find the two 1" square by 3/16" thick mild steel plates provided (SH1). .....Install one of them with flox at about BL9 left, about 2" along contour (ac) from the trim line, flush to the surface of the main wing foam core. Install the second SH1 similarly at BL9 right.  PREPARING THE MAIN WING CORES FOR GLASSING
..... At this point, the main wing cores should be jigged on your jigging table upside down, 5-minuted and bondoed in place, and not about to move under any¬thing short of an earthquake. .....Use a hard block to clean up all joggles, excess micro, and any bumps on the main wing cores. At BL00, round the joint so that the glass will flow smoothly across the joint. At the T.E. (shear web), round the corner so that the glass will flow smoothly down the face of the shear web. .....This is your last chance to determine the shape of your main wifig, so make the main wing cores as perfect as you know how. And, oh yes, RE-RE-RECHECK THE MAIN WING TIP LEVEL LINES. If you are not proud of everything that you have accomplished on the main wing so far, don't go on to the next step until you are. LAMINATING THE BOTTOM SKIN AND BOTTOM SPAR CAPS
..... Study the two sketches labled "Bottom Main Wing Lamination" and "Top Main Wing Lamination" very carefully. .....Today, you will only be doing the "Bottom Main Wing Lamination", but that one is enough, and will take 3 individuals about 2.5 hours to complete. (The third individual mixes epoxy while the other two do the lamination). .....To summarize the lamination, first you will lamin¬ate the wing skin, which is 2 plies of UNI at 45 degrees to the main wing T.E., and then you will laminate spar caps A thru F. Begin by getting your shop organized for a big lay¬up. Next, cut the UNI for the main wing skins as indicated on the sketch, labling each one so that you will know where it goes. .....Once you start this lamination, you will have to continue it until you finish, so if you want lunch, a cup of coffee, or a nap, now is the time to do it. 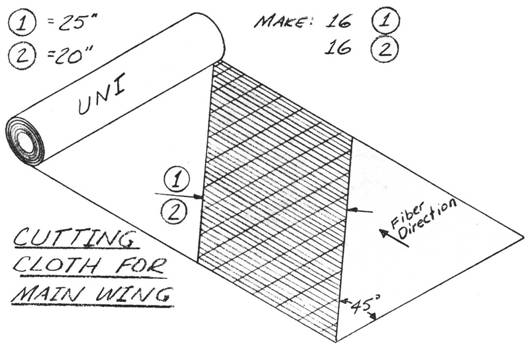 |
||||||||||
CONTINUED ON NEXT PAGE |
||||||||||
PAGE 9-3 |
||||||||||