Q2 Plans Chapter 8 Page 8-01
- Details
- Category: Q-2/Q-200 Plans
- Published: Tuesday, 23 May 2006 09:05
- Written by Quickie Aircraft Corporation
- Hits: 8532
|
BASIC FUSELAGE ASSEMBLY INTRODUCTION
..... Jigging the fuselage is your first major assembly task on the Q2. Because the Q2 fuselage shells are provided you in a prefabricated form, jigging is simplified, and there is no messy carving of urethane foam, as is the case with other homebuilts. Perhaps more important, the average builder will find that with the prefabricated fuselage shells, a smoother, aesthetically more pleasing shape will result (carving foam puts the final shape and beauty in the eyes of the carver) and that the final weight will be as much as 30 lbs lighter since all excess material is removed through the prefabrication process and the vast majority of finishing weight is eliminated. But most important probably, is that you can be sitting in the cockpit making airplane noises in a very short time a most definite incentive to finish the rest of the aircraft! PRELIMINARY TRIMMING AND JIGGING OF THE SHELLS
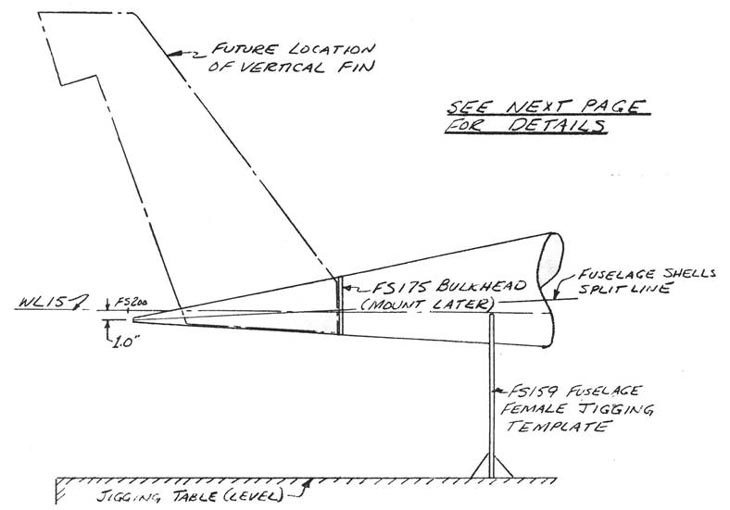
..... The fuselage shells are shipped to you in four sections - upper and lower forward fuselage and upper and lower rear fuselage. The upper/lower longitudinal cut line is arbitrary; the cut line that separates the forward fuselage from the rear fuselage coincides with the fuselage cut line used for making your Q2 trailerable. .....The shells are long, and must first be trimmed back to the proper length using the trim lines on the parts. If a particular trim line is difficult to read, trimming the part during jigging will yield the best fit. The parts should be inspected by the _uilder for quality control using the Composite Materials Education chapter as a guide. In addition, if you measured carefully, you would find that although the shells will look symmetrical left to right, that there is some assymetry from left to right. This is nothing to worry about, just note for future reference. .....Locate the 5 fuselage female jigging templates and the bulkheads that you made previously. Study the sketches to obtain a feel for where jigging tem_ates were setup to jig the fuselage approximately level with WL15 when the jigging table is level; note that the longitudinal fuselage spit line does not coincide with a WL. Establishing a WL is important so that the main wing and canard can be mounted later at the proper angle of incidence. ..... First, you should setup the fuselage female jigging templates at the FS locations called out on the templates. Use some triangular corner blocks made from scrap lumber to hold them vertically temporarily. Next, set the lower fuselage shells into the fuselage female jigging templates. Do not be concerned if you find it necessary to move the fuselage female jigging templates fore and aft to achieve a good fit; remember that you are not looking for a perfect fit, just a resting place for the shells while you assemble the fuselage. Once the locations of the fuselage female jigging templates have been astablished, Bondo them in place so that they will not shift position and rest the two lower shells into them. .....Trail fit the upper fuselage shells onto the bottom ones and make any trim line corrections at this time. It looks like an aircraft doesn't it? PRELIMINARY TRIMMING OF THE CANOPY CUTOUT
..... In order to provide access to the interior of the cockpit, you will need to digress for a moment and make a fitting of the pre-trimmed canopy to the upper for ward fuselage so that a cutout can be made in the upper forward fuselage. .....The forward face of the firewall is FS14.0; the forward face of the seatback bulkhead is FS78.0. Therefore, measure 64 inches from where the forward face of the firewall will be located along a WL to establish the aft edge of the canopy. Next, establish a preliminary BLOO line down the forward upper fuselage she 11 . .....Drape the canopy, which is sent to your pre-trimmed to rough shape, over the forward fuselage. Even up the sides by measuring the distance on each side up from the longitudinal fuselage split line and adjusting the canopy until the distances match. Also, check for skewing. .....Now, take a marking pen and draw a line around the outline of the canopy where it touches the fuselage. Some trimming of the canopy-may be required to make it fit flush against the fuselage shell. .....Remove the canopy and make a cut around the upper forward fuselage shell at the line. To be conservative at this point, you may wish to not cut quite all the way to the line, and then final trim the cutout later. All you are trying to do here is to gain access to the inside fuselage and to establish a rough fit on the canopy.  |
||||
PAGE 8-1 |
||||


