Q-talk 27 - LETTERS

- Details
- Category: Q-Talk Articles
- Published: Sunday, 30 June 1991 07:11
- Written by Jim Masal
- Hits: 10215
Dear Jim,
To recap the year, I started out by breaking the starter on the 0-200 engine. It blew into pieces, which flew around in the back of the engine, wrecking the Accessory case, oil pump, and cam gear. Got it fixed for $400 in parts. I've purchased all the parts needed for IFR operation, but they are just sitting on the shelf until I can get some time to rebuild the instrument panel. I use the plane almost every weekend and don't want to have it down for maintenance.
This year my wife and I made 5 trips to the Bahamas (Freeport and Eleuthera), to Key West, Atlanta (Dekalb-Peachtree), and Morristown, NJ not to mention flew all over Florida in search of a good lunch or breakfast. My Q-200, N3QP (factory standard tail dragger, 0-200 engine) now has 560 hours on it. I figure its flown 95,200 miles (around the world 4 times) and has burned 3136 gallons of gas (mostly auto gas). It's time to re-do the interior as Jim Masal said it looked well-used last year!
Next long trip planned is New York for Memorial Day.
Mike Dwyer, #2841, (813) 595-2382, Seminole, FL
Dear Jim:
It has been a rather busy year for me. In May I bought some unserviced land in the country and by September had to move out there.
As a result, I have not worked on my 0-235 conversion since May. I have about 200 hours work left to again be airworthy (hopefully this summer).
I have a comment, which I believe could save lives. A few issues ago you discussed the case of Q-200, Registration N5538N that crashed on June 30, 1987 in Dawson Creek, B.C. killing the pilot. The crash was the result of a main wing failure that occurred during a sharp pull up following a high-speed pass down the runway. I have a copy of the MOT accident investigation report and have enclosed the main portion. One of the observations in the report was that the wing surface had many large air bubbles between the fiberglass skin and the foam core. The report surmised that these may have occurred during heating of the wing in an attempt to correct for some twist.
I have experienced a problem in building my new canard that resulted in similar large air bubbles. They were the result of laying a regular automotive type trouble light on the surface of the canard. In some cases the damage commenced within a minute of laying down the lamp. In other cases I discovered bubbles over 8 inches in diameter and 1/2 inch deep. The damage resulted mainly from the foam melting and shrinking away from the heat of the lamp. The damage seems to occur more easily when there are fewer layers of glass over the foam. I recommend that builders never set an incandescent trouble lamp on a flying surface and, when working in confined spaces such as the compartment over the center of the wing, or the area behind the firewall, I strongly recommend the use of fluorescent trouble lamps available from many automotive parts stores and tool supply houses.
If anyone has some concerns that they might have some bubbles I found that they are almost impossible to see but could be detected by ear when the surface of the wing is tapped lightly with a small, hard object.
Enclosed is my money order for my 1991 membership, the biggest bargain in the aviation industry.
Yours truly,
Kimbull McAndrew
Box 0, Site 19, R.R. #1, DeWinton, Alberta T0L 0X0
Dear Jim
Sorry I'm late again in responding. I think I promised a letter last Oshkosh. Time just seems to fly (not the Q2, just me). I finally got up to Springfield, IL to visit with Jim Doyle and Larry Weishaar. I spent some very enjoyable hours going over their well-built bird. We spent a lot of time discussing the Doyle/Weishaar LS carbon layup canard. I'm ready to do it their way. It appears to my engineering evaluation that it is a stronger structure than the tube. That trip exemplified to me what the homebuilt movements is all about and why we are all involved. Jim and Larry took the time to share all their knowledge and experience of a new approach to build a part they determined to be better and more cost effective than what was available. It is this kind of sharing and fellowship that I don't find in any other endeavor I'm involved with. It is the same spirit that you give us in the newsletter every other month.
In that regard, I have just reread all of the newsletters from start to finish and want to tell you that I feel that the newsletters of the last two years are of superior quality and readability. I think you are starting to really get your editorial act together with all of that practice.
I have decided after attending Andy Marshall's Oshkosh seminars for several years to vacuum bag every layup I can to increase strength and decrease weight. I was turned off by the high cost of the available vacuum pumps and searched until I found a good deal. I'm using a Gast pump & motor from American Design Components, which cost $79.00. It works great and pulls 28 inches of vacuum. It is Item #23039. Their address is 815 Fairview Ave., P. O. Box 220, Fairview, NJ 07022. Phone 1-800-524-0809.
I was working like mad on old #2531 after my trip to Springfield but as work and travel took over, I haven't done anything for two months. I need another kick in the rear. It won't be long until Lakeland. That will get the juices flowing again. Thanks for another year of making it happen!
Larry Kehler, St. Louis
Jim,
I want to tell you how much I have enjoyed my first year as a Q.B.A. member. Your efforts are sure appreciated. The building tips and experiences of the other members are invaluable and make the newsletter really fun and informative to read. I started to build a Q-1 from scratch (plans only) but later had a change of heart when I found a complete unbuilt kit (#149) for sale. I now have the kit and am getting a good start on the plane. I plan to use the Rotax, so I will make the necessary modifications right from the get go. Jinx and Brock were kind enough to send me a set of mount diagrams several months back, thank you again Brock and Jinx! I traveled to Camarillo last spring to take a look at their planes, - really nice! It sure helps to see a completed Quickie; it gives you an idea of how things go together and what improvements should be made. I plan to, among other things, gusset the control system arms, probably dowel the elevator torque tubes and close the ends with BID, add some very thin and light mechanical drum brakes from an ultralight to my wheels; they stop some pretty good sized ultralights, so they should give good, even braking to the Quickie. I may also extend the rudder chord and use an aluminum bushing at the lower hinge point. I also plan to use thicker hinge material on the aileron and elevator center hinge pivots with stainless steel busing material in place of the aluminum. The pivots will be increased to 1/4" in size. I will write more in the coming months as construction progresses. By the way, Dennis Clark's suggestion for setting the wing and canard incidence in the December Q-TALK is great! I have wondered for some time how to do this accurately. Dennis's solution looks simple and quick. Dennis could probably split an atom with a chisel! I plan to make accurate drawings of the metal control system parts for the Q-1, and should anyone need them send a SASE and I will send them out -- it's doubtful (my Quickie must surely be the last one anywhere at this stage of construction) but you never know.
Tom Graves
11424 Moreno Avenue, Lakeside, CA 92040
Dear Jim:
Just wanted to give you an update on #2353. Things have been moving quite slowly of late due to a few changes in my life. A new house, a move and a baby on the way. Spare time has been difficult to find.
I had a free round trip airfare coupon burning a hole in my pocket, courtesy of US Air, so I felt a long distance trip was in order. I contacted John Groff in New Jersey so we made the rendezvous on the weekend of Dec. 1 & 2.
John has made several innovative changes on his plane so I thought a closer look was needed. I owe John and his wife a big "THANKS" for their putting up with me for all weekend and the knowledge gained. It's hard to beat the experience of someone who has been there like John. I was able to learn a lot and gain incentive to keep going on my project.
I am working on the final panel layout as well as all engine plumbing. I also need to complete firewall forward but have mostly everything organized the way I hope will work best.
Once again thanks for your efforts in keeping this newsletter together. It means a lot to us builders who have been at this thing a long time.
P.S. We now have four active Q-Builders in our EAA Chapter 393. We just picked up another who had purchased a partially completed project.
Best Wishes,
Dennis Colomb #2353, Vacaville, CA
Dear Jim,
First of all, let me say that I subscribe to your comment regarding "over-confidence of experience". It is a pitfall too many of us can be caught in. I honestly think I could fly the Q-2 after going through all the taxi trials you suggest and checking the accuracy of the plane Wes built but for better or for worse, I have placed an order with Scott for the tri-gear conversion. Matter of fact it should be here this week. We flew to Springfield for a good visit and examination of their tri-gear stable and I liked what I saw and heard. Further I had no luck at all getting Marv Getten to give me a ride or even check out Wes's plane. He said his insurance didn't permit giving anyone a ride and he didn't have time to buzz down to Rochester for a look-see. I have no argument with his position whatsoever, but I was disappointed in not benefiting from his experience. I was at Flying Cloud Airport in Minneapolis last week and in response to my queries was told that he isn't seen flying much at all this summer so I don't know just what he is doing. Next I flew up to Siren, WI to see a Q-200 hoping that I might get a ride. Found out that the plane, four or five years old, has never flown. Builder spun it all over the airport in taxi runs and parked it in a hangar and is paying storage ever since. I looked at the plane and even though the tires are flat and there is at least an inch of dust and dirt on it, it has a beautiful paint job and is not too bad a looking plane.
Walt Halloran, MN
Jim,
I had a rather humbling experience last weekend. (Translation - Got the shit scared out of me.) Some local aviators bought a Q200 - but insurance was not available unless they got a check out by a CFI with at least 25 hrs. in type. (The insurance company didn't think they would be able to find one! Ha - there was one right next door - me!)
To make this as short as possible - all had been checked out/signed off but one, and we were almost there. We had flown to Hearne - 7,000 ft. x 150 ft. runway, no traffic, everything working fine! We were going to do one more landing before going back to Houston. (Mind you, no controls on my side!) We made the approach, flare, and was rolling out when all of a sudden the plane takes a turn for the pasture. At first, in a medium voice (we had intercom), I began suggesting, "left rudder". I felt like a drill sergeant - more left, more left rudder". But all this wasn't working, and as a last ditch effort by the pilot to "steer" the plane with aileron (guaranteed to help you in the direction you don't want to go), I could tell we had a rough ride ahead. After the dust settled, we got out to survey the damage. Fortunately, the only damage was to the paint on the vertical fin. - The tailwheel assy. had broken off just forward of the pivot and was still with us because the cables remained intact. This could have been a lot worse - for the plane and us. The plane that I now fly was heavily damaged because a 50-cent Nicopress sleeve let one cable slip. Two thoughts here - it goes without saying that a good preflight is essential to your well-being and even though we lost directional control - aileron steering could one day make or break your airplane - don't be complacent or you might otherwise ruin your day and a fine airplane!
Mike Conlin, TX
Dear Jim,
Enclosed are some progress pictures.
The last glass work was on the longerons but with Christmas and winter I'm looking at hardware items such as the belly board control and control sticks and whatever.
My dad has the tail section from #2214 that he wants to get rid of. It was not cut in the same place as the factory cut but about three inches aft. It has the T-tail installed and is in reasonable shape. Give him a call at (404) 474-7593.
Every time I receive a Q-Talk I get charged up and want to take a couple of weeks off and work on my bird and I plan to next year.
Richard Barlow, Stockbridge, GA
Dear Jim,
24H made one trip last year. I flew it from my home base in Salt Lake City to my new home base in Livermore, CA. Upon arrival I received a letter that the Maloof prop had been grounded. (I have a turbo Revmaster.)
I used the down time to have a number of minor problems corrected. I had a Westach combined oil pressure and temperature gauge. Because of who knows what the oil pressure gauge would occasionally go to "0". That gets your attention! We mounted a direct reading gauge and proved that is was the gauge and not the engine. I was nervous about running an oil line to the instrument panel, but it has worked out OK and I'm satisfied. The engine was leaking oil. I found that it was the lower spark plug covers. We filed the covers flat, made gaskets and used RTV. That solved my oil leaks.
To solve my prop problem, I ordered a Lectro Prop. Their people were very helpful. My only complaint was that delivery was promised at 8 weeks and it took 7 months. The quality of manufacture was good. They should be faster now since my hub was their first production of a new lighter design. My problem was that the new prop was still 4 pounds heavier than the old prop. (It was also 2" larger in diameter.) I say, "was" because on my first run up the plane starting rolling. I grabbed the brakes and the plane went over on its nose. The prop is now about 8 inches in diameter. Would I do things differently if I had a chance? Yeah! So back the prop went. They are going to work with me on getting carbon fiber blades, which should be substantially lighter than the wood blades I had. In the meantime I ordered a fixed pitch prop. As soon as that gets mounted, I'll fly to my new home base in Houston. Now that I live in Texas, I ought to be able to finally drop by and see you. Maybe in '91.
Brian Bulaw (713) 668-6691
Dear Jim:
Some recent discoveries have added a little color to my Q200 project and I just thought that I would pass it along for everyone.
I purchased kit #2672 from a private individual in October '87. It had little done except for the joining of the forward fuselage top and bottom and the placement of the fuselage bulkheads. A vertical fin, rudder and ailerons were also completed. Since then, I have refabricated the last three items to my own satisfaction and reapplied all fuselage split line tapes on the sides.
After getting the wings and canard mounted and getting the main tank in place I started mounting my mag box. After cutting through the plywood, I discovered a number of glassed areas on the engine side of the firewall to be loose and delaminated from the plywood surface. Careful inspection showed a paper template to be contact cemented to the engine side of the firewall under the fiberglass. With the aid of a belt sander and Dremel I removed the glass on the surface and the forward lip tapes in about two hours. Glass was reapplied to the surface later in the evening. Let this be a note to the new kids on the block who are hot to work on their previously owned Quickie. Check everything!
I recently pulled my $2600 0-200 engine apart to begin the overhaul process. I bought my engine from a private party through an ad in Trade-a-Plane. My cylinders went to Pacific Continental in Van Nuys and got a $813.00 Class A refurbish. (They look great and have as new dimensions.) My crankshaft, however, is a different story. The mechanics were initially enthused by the good condition of the metal, but an apparent prop strike showed up in the form of a 20 thousandths bend in a corner of the crankshaft prop flange. I was imagining the $1200-$1600 replacement cost. Magnaflux showed no cracks and repair was completed on the crankshaft. I got out with my shirt and a yellow tag for $395. If you don't have an engine, read Firewall Forward before you buy one. I had a good Christmas present in spite of this oversight.
The FAA just allowed me to reserve N559BM for Q200 #2672. I am expecting to get it out the door in 6 months. Wish me luck.
Brian Martinez, Quartz Hill, CA (805) 943-5379
Jim,
Q-200 N17PF (S/N 2652) had its first flight on 13 August 1990 at 18:41-19:16 CDT. The weather was perfect - 5500 scattered, winds 000 at 0 (dead calm!). I had taxi tested for about seven hours working up to 65 MPH with the aileron tips reflexed full up and the elevators in full down to make sure it would not leave the ground. I wasn't sure what my takeoff speed was, but 65 was as fast as I wanted to try.
For first flight I adjusted the reflexor so the ailerons were about 1/8" up (I forget who told me to do that). Apparently that wasn't enough because on takeoff the tailwheel came way up and I thought I was going to grind the prop into the ground! However, not knowing what I was doing, I just continued on. Once I reached flying speed the right main left the ground, followed shortly by the left. Before I could correct, I had assumed a shallow left turn off of the runway at about 3 feet of altitude. Since I was flying and the engine was running well, I just let it climb in the tail high configuration for about 1000 feet.
I adjusted the reflexor to lower the tail and it climbed much better. At 2000 feet I experimented with a couple of slow turns to the left and right (while circling the airport) just to see how it handled. At that point I noticed that the right side of the canopy (forward hinged) as not latched properly. I considered just leaving it alone, but I was able to re-latch it.
Everything was going well, so I climbed to 4500 feet and tried out slow flight. Stalling was not part of the flight plan; I just needed to know how it would feel at touchdown. Also, I didn't know how accurate my airspeed indicator was, so what I was really looking for was an indicated approach speed. 80 MPH didn't feel too bad, but 85 felt a lot better!
Once I had my approach speed, I descended back to pattern altitude .......
(finish rest of sentence - REST OF ARTICLE MISSING
.... idea of the digital. He doesn't know that I've started yet so I hope to have it ready for Christmas and surprise him. Quickie flying below sea level is great so I'm sure he will need it yet this winter.
Charlie Lipke (0335), La Crosse, WI
ARTICLE MISSING
Dear Jim:
First, a quickie:
I found my wheel grossly out of balance and out of alignment. I used shims where the brake discs are attached to the wheels and, for one wheel, shims between halves of the wheel to make it run true. One wheel required 1 1/2 oz. of balance weights, the other 1 oz. At 1800 RPM this could have been serious.
Second - next generation brake mounting design:
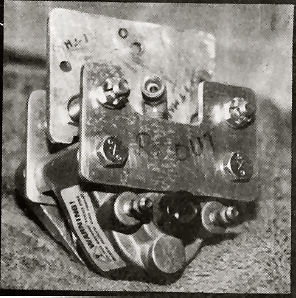
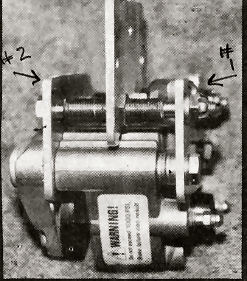
The designs by Bob LaRue (Issue #11) and Quentin Durham (Issue #22) convinced me that this is a better way to go than the floating disc scheme, and I developed their idea as presented in the photographs and drawing attached. This design is more compact than theirs, using about the same area as the LG10 of the original design. It used the same mounting holes in the pants and results in the same fit relative to the disc, and I am able to use the same streamlining blisters I made for the QAC design.
The basic accomplishment is the same, a positive alignment of the caliper, which won't cock or bind. Instead of a shaft attached to the mounting bracket, sliding (and vibrating) on the edges of holes drilled in the aluminum plates, I have steel bolts rigidly attached to plates #1 and #2 sliding through steel tubes attached to the mounting plate, providing much more area at the interface. The steel tubes are threaded into the mounting bracket to permit initial adjustment of the stationary puck relative to the disc. The movement of the caliper, accommodating wear of the pucks, is limited by the end of the tubes. They may be set to prevent metal-to-metal contact when the puck is worn out. Enough clearance exists for some disc misalignment.
Refer to the photographs. The threaded tubes attached to the mounting bracket are 1 1/2" long, 3/8" OD, .050" wall, the same as should have been used for LG12 spacers. DON'T BE TEMPTED TO USE 1/8" PIPE! I used a lock washer and double jam nuts one side only because of poor access to the other side.
The tie bolts which fit in holes F, G, K and L are 1/4" AN4-24 (drilled shank) to receive castellated nuts.
The assembly bolts are 1/4" AN4H-25A (drilled heads), for safety wiring.
The tie bolts need not be much more than finger tight. I used 5 thick (1/16") washers, each side, for spacers between Plate #1 and caliper. My new LG-12 spacers are 1 7/8" long.
Don Coughlin Q2 #2348--, San Ramon, CA (510) 828-2418
BRAKE MOUNTING DETAILS
Notes
1. All plates are 1/8" thick alloy aluminum.
2. All holes to clear the bolt sizes given.
3. Hole A & B are same as on LG10 page X of instructions, will fit same holes in pants.
4. Hole C is added to permit easy leveling of bracket to parallel 6" brake disc.
5. The dashed area may have to be cut out to clear pipe fitting.
6. Drill and tap holes D & E carefully, perpendicular to plate.
7. Radii on plate #2 are to clear puck (7/8" r.) & disk (3" r.).
8. The opening atop plate #1 is to clear pipe fitting.
9. Names of parts & general arrangement same as used by Bob and Quentin.
10. Threaded sleeves, in my case, protrude 5/8" outside of mounting bracket, 3/4" inside.
11. New LG12 spacers, 3/8" O.D., penetrate holes H & J.
Don Coughlin, San Ramon, CA 1/91
You can order a PDF or printed copy of Q-talk #27 by using the Q-talk Back Issue Order Page.