Q2 Plans Chapter 17 Page 17-01
- Details
- Category: Q-2/Q-200 Plans
- Published: Thursday, 04 May 2006 20:05
- Written by Quickie Aircraft Corporation
- Hits: 5691
|
FUEL SYSTEM INSTALLATION INTRODUCTION
..... The Q2 fuel system consists of a main fuel tank that forms part of the seat, and a fuel header tank positioned above the passengers' legs. The carburetor receives fuel by gravity feed from the header tank. The header tank is filled from the main fuel tank by an electric fuel pump, with a manual fuel pump as a backup. An overfill line in the header tank continually recirculates the excess fuel pumped by the fuel pump back to the main fuel tank. Each tank has a seperate fuel gauge. In the event of a complete fuel pump failure, a full header tank is sufficient for over 225 statute miles at economy cruise. The main fuel tank i s fi 11 ed from a fuel cap 1 oca ted on the right si de of the fuselage just ahead of the instrument panel. The header tank can only be filled using the fuel pump. FUEL FILLER SYSTEM
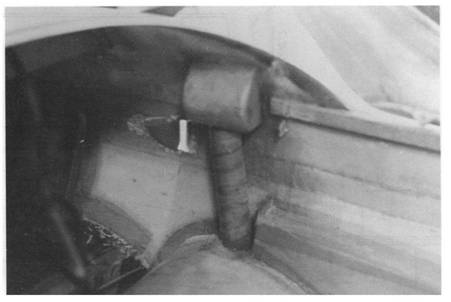
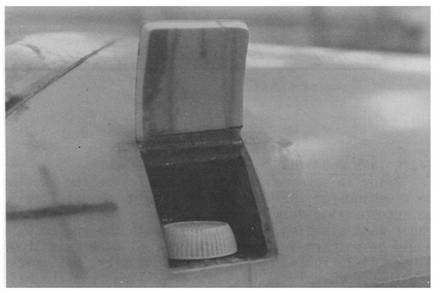
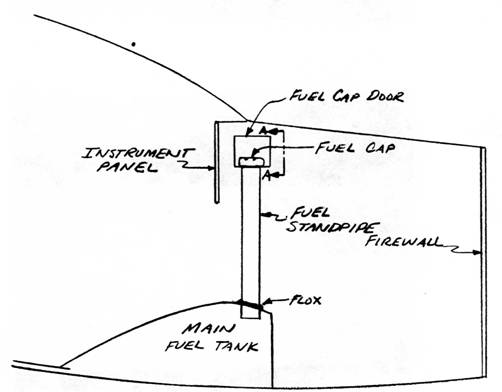
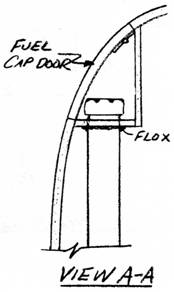
..... Provided with your Q2 kit is a small storage bottle. By cutting the ,neck from this bottle, the upper part can be used as the fuel cap. The storage bottle top is compatible with fiberglass/epoxy laminates. As an option, the builder might consider using a convent¬ional aluminum fuel cap, but the mounting will be more difficult. .....Once the top of the bottle has been cut off, trundle down to your nearest plumbing supply place and find a piece of PVC pipe of approximately the same diameter. Then, trundle back home and laminate the storage bottle neck to the PVC pipe with 2 BID.. Be sure to sand both surfaces prior to the lamination. .....Take a magic marker and mark the location on the outside fuselage skin where the fuel filler door must go. Carefully, cut out a door and save it for later. Next, make ,a recess for the fuel cap from 1/4" white foam and fiberglass/epoxy. .....As shown in the sketches and pictures, the PVC pipe is bonded into position with flox. The recess prevents spilled fuel from entering the cockpit. .....To hinge the fuel cap door, you could use a small piece of hinge and bond it in place. However, because of the fuselcige shape, this may not be satisfactory. An alternative is to make a small pin type hinge. Find a small diameter (about 1/16" diameter) steel rod. Grease it with vaseline to prevent adhesion by the epoxy, and lay it flat against the upper inside portion of the fuel cap door. Laminate 3 BID over it. When cured, the pin will still be able to rotate, but will be restrained by the cured laminate. Finally, fit the door carefully and bond the ends of the pin to the fuselage on either side of the fuel cap door cutout. Presto, a hinged fuel cap door. .....Finally, drill a 1/16" diameter hole in the top of the fuel filler cap. This will serve as the main tank vent.   HEADER TANK CONSTRUCTION
..... Previously, in Chapter 14, you have installed the main fuel tank permanently in the fuselage, along with the main fuel tank fuel gauge. .....The important fuel header tank dimensions are shown in the accompanying drawings. This fuel header tank is installed against the upper fuselage inside skin approximately 5 inches aft of the firewall. Sufficient room must be left so that the pilot's and passenger's feet will clear the header tank. .....The large sump is a simple rectangular box. The upper portion of the header tank is curved to fit with¬in the fuselage. This section must be custom fitted to each individual aircraft. Suggested heights for the front and rear pieces are provided as a guide. The length of 12 inches should provide sufficient clearance for the instrument panel radios and instruments. How¬ever, this header tank should be adapted to your particular aircraft, verifying that both the pilot and passenger can be comfortably seated. .....All pieces for the header tank should be cut from the 1/4" thick white foam. One BID on either side of the foam is used when assembling the header tank. The laminations that will 'see' gasoline, should be made slightly wet to minimize leakage.   |
||||
|
||||
PAGE
17-1 |
||||


