Q-talk 13 - Q-TIPS


- Details
- Category: Q-Talk Articles
- Published: Saturday, 31 December 1988 06:11
- Written by Jim Masal
- Hits: 2449
From Jerry Jerome, Cohasset, MA
I recommend the West System for doing the finish work. I tried to make it as thick (lots of microspheres) to save weight and found it easy to sand. For sanding, I used a 4' sanding stick (2x4) which I had planed to be perfectly flat - with two 2' sanding belts in coarse 36 and medium 100 grits. Sanding motion was per plans (45 degrees to the leading edge) and the result was an excellent surface. Final contouring to achieve the .005 min. surface waviness will be done using the Dupont 131S primer surfacer, also with the sanding stick and starting with 220 grit.
I don't think I am going to have the stamina to continue my sanding efforts on the final finish paint as recommended by QAC in the article "Performance Finishing" to achieve the .002-.001 surface, but I feel I may come close to it anyway by "doing it right the first time".
From Dennis Clark, Newman, GA
I want to tell you about the "Anderson Wheel". It is similar to a rotary wire brush except that the "wire" is nylon instead. It is an accessory for use in a drill motor and I have found it is very good for scuffing the surface of cured fiberglass in preparation for adding more glass plies or prior to filling the weave. Unlike sandpaper, it "wipes" the hills and valleys without destroying the fiberglass. Of course if you try hard it will damage the fibers, but with a modicum of care it will not happen.
I can thoroughly prepare one side of a wing or canard from tip to tip in 30 minutes or less and believe I will have a better bond than if I used sandpaper. (Wheels are 3" in diameter - ED.)
Anderson Wheel (filament Brush)
Cat. #22343 DM3 BO40120
Industrial Supplies Co.
1291 NW 65th Place
Ft. Lauderdale, FL 33309
$3.90 ea. - Suggest min. order of 5
From Scott Pihl
A word on Peel-Ply: It works great for structural adhesion but leaves a lot to be desired in the finish stage. It takes too long to apply and is harder to sand in certain areas because it is solid epoxy. I'd rather feather the edges of the exposed glass layers with a hand sanding-block (very carefully). Takes time sanding, but a better result.
FUSELAGE SPLIT LINE: Simplest method is to bond fore and aft section together with dry micro after insuring a good fit. Let cure. Apply required BID tapes and cure. Take a piece of veneer tape and wrap around the fuselage. This will give a straight cut when following the edge of the tape with a blade.
DRAWING BY: Phil Haxton - 12/27/88
BUILDER'S TIP:
One of the best tips I can pass along is how to make your parts serviceable. One of the ways I have done this is by using phenolic block to hold aircraft bolts in place so that you only need to attach some object to the bolt and add a washer and nut to hold it in place.
For example: I have shown a simple pulley assembly, which is mounted to a phenolic block. The phenolic block can be floxed & glassed to any composite surface or if sized properly can be bolted or riveted to a surface. The purpose of the phenolic block is to hold the head of the bolt & prevent it from turning while you tighten the nut.
To fabricate the assembly shown I first clamped the aluminum angle to a small block of 3/8" thick phenolic. I then drilled two # 10 holes through the angle & the phenolic block. Next, I drilled the opposite side of the phenolic block with a drill slightly smaller than the head of the A-N bolt. I drill only deep enough to allow the head of the bolt to be driven with a hammer flush with the bottom surface of the phenolic block. This will allow the block to sit flat on the surface it is to be attached to.
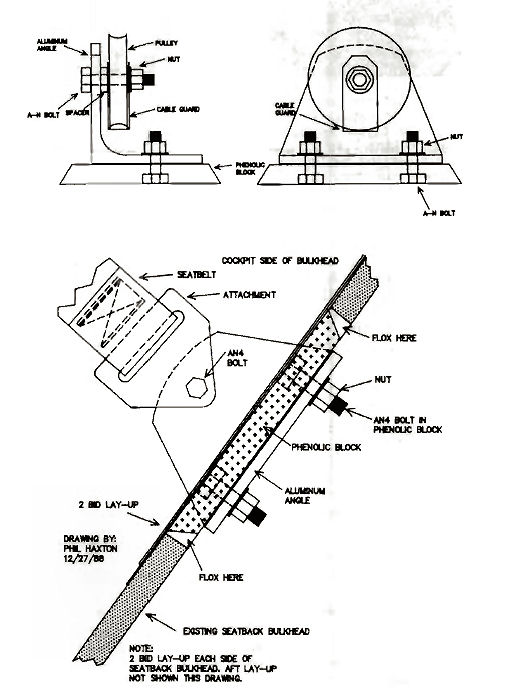
BUILDER'S TIP:
I relocated the seatbelt attachment points from the bottom of the fuselage to the lower area of the seatback bulkhead. I prefer this to the original as it is easier to sit on and less trouble to upholster around.
You can order a PDF or printed copy of Q-talk #13 by using the Q-talk Back Issue Order Page.