Login Form

Q1 Plans Chapter 3 Page 3-6

working periods, keep some resin & hardener in the warmest place of your house for use on the next layup.

Save your mixing cups, as they can be used as a quality check of your epoxy. After a day or two take a sharp knife point or scribe and scratch the surface of epoxy in the cured cup. If the epoxy cured properly the scribe will make a white scratch mark. If the epoxy hasn’t cured the scribe will make a dull ridge, indicating a soft surface. If this occurs the epoxy is not cured either due to inadequate time or temperature, or bad mixing or bad epoxy.

Microspheres

Microspheres are a very light filler or thickening material used in a mixture with epoxy. Micro, as the mixture is called, is used to fill voids and low areas, to glue foam blocks together, and as a bond between foams and glass skins. Several different types of microspheres and microballoons are available commercially. The quartz-type supplied by QAC distributors is lighter and cheaper than most common types. Microballoons must be kept dry. If moisture is present it will make them lumpy, bake thea at 250°F then sift with a floor sifter to remove lumps. Keep the microballoon container covered.

Micro is used in three consistancies: a "slurry" which is a one-to-one by volume mix of epoxy and micro- spheres, “wet micro” which is about two-to-four parts microspheres by volume to one part epoxy, and "dry micro” which is a mix of epoxy and enough microspheres to obtain a paste which will not sag or run (about five parts—to—one by volume). In all three, microspheres are added to completely mixed epoxy.

You do not have to accurately mix the microspheres; just dump them in until the desired consistancy is obtained. Micro slurry is used to paint over foams before glass cloth is applied over them. Slurry is almost the same viscosity as the pure epoxy and is runny enough to apply with, a brush. However, the easiest way to apply slurry is to pour it onto the surface and spread it out evenly using a squeegee. When skinning urethane foam use a full thick coat of slurry. Inadequate slurry on urethane can result in a poor skin bond. Wet micro is used to join foam blocks and, while it is much thicker than slurry, it is still thin enough to sag and run (like thick honey). Dry micro is used to fill low spots and voids and is mixed so that it is a dry paste that won’t sag at all. In all three micro types, you don’t measure, just add microspheres until the desired consistancy is obtained. Use micro only as specifically shown - never use micro between glass layers.

JOINING FOAM BLOCKS WITH MICROPHERES/EPOXY

Always use the following method to join foam blocks. This is extremely important. Always use RAES.

  1. Check that the foam blocks fit closely together. If there are voids over 1/16 inch, sand to fit or fill the void with a sliver of foam.
  2. Paint a light coat of micro slurry on both surfaces. If joining foam to fiberglass paint pure mixed epoxy (no microspheres) on the fiberglass surface and micro slurry on the foam surface.
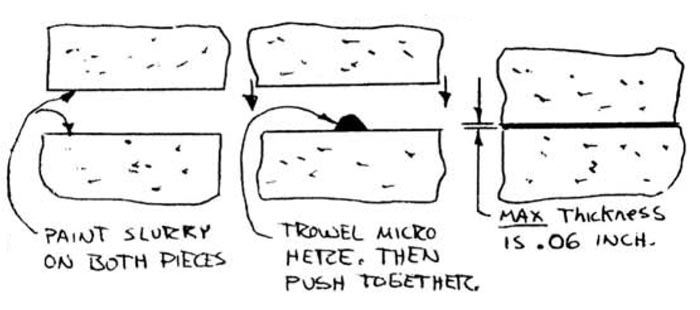
  3. Refer to the sketch and trowel wet or dry micro in the center of the joint. Thus when joined the micro is pushed outward expelling (rather than trapping) air. If the fit is excellent use wet micro. If it is open enough and vertical such that epoxy may run out, use dry micro.
  4. Push the two pieces together, wiggling each to move the micro toward the surfaces. Be sure the micro is no thicker than 0.1 inch at any place, to avoid exotherm. Wipe off any excess. Do not be concerned if the micro does not completely reach the surface. That void can be filled immediately before skinning the part.
Joining Pieces of Foam

Flox

Flox is a mixture of cotton fiber (flocked cotton) and epoxy. The mixture is used in structural joints and in areas where a very hard durable buildup is required. Flox is mixed much the ssme as dry micro, but only about two parts flock to one part epoxy is required. Mix in just enough flock to make the mixture stand up. if “wet flox” is called out, mix it so it will sag or run.

When using fiox to bond a metal part be sure to sani the metal dull with 220- grit sandpaper and paint pure mixed epoxy (no flox) on the metal part.

BONDO

Bondo

Throughout these plans the term “Bondo” is used as a general term for automotive polyester body filler. Bondo is used for holding jig blocks in place and other temporary fastening jobs. We use it because it hardens in a very short time and can be chipped or sanded off without damaging the fiberglass. Bondo is usually a dull gray color until a colored hardener is mixed with it. The color of the mixture is used to judge how fast it will set. The more hardener you add, the brighter the color of the mixture gets, and the faster it hardens. This simple guide works up to a point where so much hardener is added that the mixture never hardens. Follow the general directions on the Bondo can for fast setting Bondo. Mixing is done on a scrap piece of cardboard or plywood (or almost anything) using a hard squeegee or putty knife. A blob of Bondo is scooped out of the can and dropped on the mixing board. A small amount of hardener is squeezed out onto the blob and then you mix to an even color. You will mix the blob for about one minute. You will then have two to three minutes to apply it before it hardens.

Be sure to clean the board and putty knife off before the Bondo is completely hard. MEK will clean Bondo off your putty knife and squeegee if it isn’t completely hardened.

Q1 Plans Chapter 3 Page 3-7

Foam

Three different types of rigid, closed-cell foam are used (and several densities). A low density (2 lb/ft3), blue, large—cell styrofoam is used as the foam core of the wings, rudder, and canard. The blue foam is exceptional for smooth hot wire cutting of airfoil shapes. The large cell type used provides better protection from delamination than the more commonly used insulation-grade styrofoams.

Low density 2 lb/ft3 green (or light tan) urethane foam is used extensively in the fuselage and fuel tanks. Urethane foam is fantastically easy to carve and contour and is completely fuel proof. The urethane used is U-Thane 210 or equivalent.

PVC foam in medium and low densities is used in fuselage bulkheads and other areas where higher compressive strength is required. The light red PVC is 61b/ft3 and the orange is 3lb/ft3. Do not substitute foams for those supplied by the Quickie distributor . For example, the Quickie blue styrofoam has great glass surface peel strength than the standard blue styrofoam sold by some distributors. Also, we considered using the "fire resistant" BROWN urethane instead of the green 2-lb urethane, but found its physical properties, fatigue life, and fuel compatibility to be much lower than the urethane supplied to Quickie builders. Do not confuse styrofoam with white expanded polystyrene. Expanded polystyrene is a molded, white, low density, soft foam, which has the appearance of many spheres pressed together. This is the type used in the average picnic cooler. It disappears immediately in the presence of most solvents, including fuel, and its compression strength and modulus is too low.

All three types of foams, PVC, urethane snd polystyrenes are manufactured in a wide variety of flexibilities, densities and cell sizes. Getting the wrong material for your airplane can result in more work and/or degraded structural integrity.

Sun damages foam, keep it covered.

HOT WIRE CUTTING

The airfoil-shaped surfaces of your VariEze are formed by hot wire cutting the blue styrofoam of 2lb/ft3 density. The hot wire process gives airfoils that are true to contour, tapered, properly twisted, and swept with a minimum of effort and the simplest of tools. The details for making your hot wire saw were shown on page 3-2.

The hot wire saw is a piece of stainless steel safety wire, stretched tight between two pieces of tubing. The wire gets hot when an electricial current passes through it and this thin, hot wire burns through the foam. By making smooth steady passes, the hot wire gives a smooth, even surface. The foam offers little resistance to the hot wire’s passage. To get a smooth accurate cut, a template is required. Templates are made from thin plywood, sheet metal, masonite or formica. A variable voltage control is used to supply the electrical current that heats the wire.

The blue foam used in your flying surfaces was selected for a combination of reasons and its hot wire cutting ability was one of them. Other types of foams are readily hot wire cut, but some (white explanded polystyrene) have poor physical properties and others (urethane) give off poisonous gases when hot wire cut. Use only the recomeanded materials!

Hot wire templates can be made from 1/16 to 1/4-inch plywood, formica, or masonite .032 to .064 sheet metal. It is importsnt to have smooth edges on the templates. A rough edge may cause the wire to hang up and burn into the foam excessively. Templates are required on both ends of the foam being cut. The size, shape, and orientation of the two templates is varied to taper, and twist the foam core as required. The planform (span end sweep) is set by squaring up the foam block before the templates are used. In general, the trailing edge of the wing is the reference.

Full-size template drawings are provided in the plans. To make your templates, just glue the template drawings to a piece of plywood or sheet metal and trim to the contours shown. There are a number of markings on each template which aid in the alignment and cutting of the foam core.

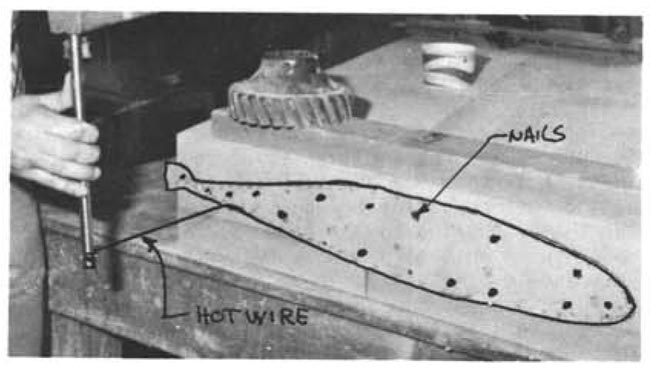
Each template has a waterline (W.L.) marked on it which is used to align the twist of the foam core. Each template’s waterline is leveled using a carpenters bubble level. This assures that the relative twist at each template is correct. The template is then nailed to the foam block to obtain the correct plan form.


Quickie Hot Wire Foam Cutting

Each rib template has numbered marks running from the trailing edge around the leading edge and back to the trailing edge. These are called “talking numbers.” When the foam cores are cut into their airfoil shape, the talking numbers are used to assure that each end of the hot wire is coordinated to obtain the correct, tapered airfoil. The person calling the numbers should be at the largest template. A typical cut would sound like this: “Resting on the tab 1/4” from the foam, moving forward, entering foam now - one, half, two, half, . . . , 34, half, 35, half, 36, coming out of the foam and pausing on the tab, wire’s out.” As the cut is made, the person on the small rib follows the numbers, passing over them as he hears them called out. Pause marks are indicated in places where it is necessary to pause for a couple of seconds and let the hot wire’s center lag catch up with the ends.

Praparing a foam block for an airfoil cut is begun by trimming the rectangular foam block to the basic dimensions for the correct planform. These “trim” cuts are made using two straightedged trim templates. The templates are held against the foam by nails through the template into the foam. Enough nails should be used to hold the template firm so that it won’t move when the hot wire is held against it.