QuickTalk 7 - Q2 HINTS

- Details
- Category: Q-Talk Articles
- Published: Friday, 31 December 1982 06:11
- Written by Jim Masal
- Hits: 2351
From Tom Gordy, #2151:
1. (Brakes) Using washers to shim the brake disks may be a bit thick. I used pieces of a Coca-Cola can. These are about .005" thick and allowed me to cut the wobble in mine to .004". Also, while repeatedly removing and inserting the AN3H-4A bolts, I sheared two of them. It may be that the unthreaded portion is longer than the brake disk is thick. If this is true, all bolts should have a washer between the brake disk and the QBSM5 standoff. Getting a broken bolt out of QBSM5 is not easy.
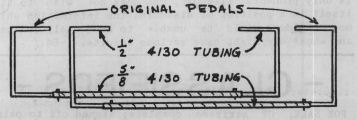
2 My dual rudder pedals were installed slightly different from Ennis Barlow's (Issue #3). I used two pieces of 5/8" OD x .065 wall 4130 which were 19" long and two 18" pieces of 1/2" x .049 wall 4130 cut into the same pieces used to make the original rudder pedals and welded into duplicates of the original pedals. Also needed were four AN3-7A bolts and four AN363-1032 nuts. It took some reaming with a 1/2" drill, but I fit the pedals into the 5/8" 4130 and used the bolts to hold everything together. Each pair of pedals is about 28" long. They are held on the canard by drilled phenolic blocks. Placing the blocks near the bolts allows the pedals to be removed. Also, having all pedals 'pointing in' gives clearance for the magneto and starter box. Total cost for all materials was less than $8.
From Bob Falkiner, #2015:
1. (Page 14-1) I'm not impressed with the QAC builder tip regarding the sanding of the tailspring to fit QTW3. (See Q2BT55 in QAC Newsletter.-Ed.) They recommend a collar over QTW3 and the tailspring (with 3 BID) with two holes drilled in the S-glass spring. An improper collar installation may be asking for trouble. The collar must be close fitting on both members to avoid localized stress points. By far, the best approach would be to make a new part QTW3 using 7/8" OD tube to allow installation as designed. There is NO WAY that a .632" OD spring plus 3 layers of BID (.013"/layer), which comes to a .710" total dia. will fit into a .677" ID hole! QAC should give their builders a break - a broken tailspring is just too damn difficult to repair.
From Gabe Zappia, #2149:
1. (Page 14-1) Cut two 3/8" pieces of Nylaflow tubing and make a lengthwise cut down one side of each one. Pry open the Nylaflow and slip it over the QTW5/QCSA10 cable. Now, by folding the tubing over on itself, you can reduce its diameter enough to slip the C-69 spring over it, reducing the abrasive rubbing of the spring and cable.
2. (Page 17-1) To make a locking gas cap, inlay with flox a phenolic insert, flush with the outside bottom of the door. Use this to hold a "Cam-lock" type lock. To give the lock something to wedge against, lower the bottom of the filler compartment 3/4" and use the inside of the fuselage. A small steel plate will wear better than the glass. I angled my fuel filler compartment so that spilled fuel gathers in one corner, where it is vented outside. A similar door, placed below the left longeron, will allow the canopy to be latched from outside. Note that the lock keeps the door from being pulled out. To keep it from being pushed in, angle the cut so that the door's sides are slanted.
From Kenneth Hall, #2681:
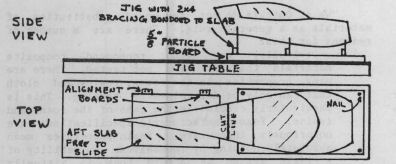
1. (Page 8-2) When jigging the fuselage, nail an extra piece of 5/8" particle board over the surface of the jig table with several large box nails, and bondo the jigs to this slab. When the fuselage is finished, just remove the box nails and the entire fuselage can be lifted off the table still bonded to its jigs for safe storage. Also, the table will be clean and ready for the wing. Do the same for the aft shell jigging except rather than nailing the entire slab to the table, nail a few 1" x 1" x 3" boards to the table along the edge of the slab. Now the tail can slide fore and aft along its centerline allowing work to be done on the front/rear joint line.
2. (Page 8-5) Use a simple jig to bow the longerons. Find a piece of 3/4" plywood or particle board about 6" wide and as long as the longerons. Have someone hold this board against the fuselage side where the longeron will be located. Next set a drawing compass to the widest gap between the board and the fuselage side, and trace the fuselage contour on the board. Roughly cut the board along the traced line with a sabre saw. Clamp the longerons to this jig, wetting them occasionally. They may take several days, so plan ahead. If they spring slightly when released, insert bundles of stirring sticks to increase the curvature and clamp back into place. Of course, make sure the longerons are dry before glassing.
3. (Page 8-1) When trimming the fuselage shells, sand them to about 0.2" from the trim line with an extra long 36 grit sanding board. Next, place the upper shell into position and using a compass set to the widest gap, trace the contour of the lower shell onto the upper one. Carefully sand the top shell to this new line, working slowly.
From Ronald Cross, #2397:
1. (canopy) I was concerned about the upper and lower forward fuselage shells not aligning after the canopy was mounted and the aft canopy bulkhead not being parallel to the seatback bulkhead with proper spacing. I used the following method: Join the forward fuselage shells with all bulkheads in place. It may be necessary to remove up to 1/4" from the rear center area of the canopy so that it will cover the aft canopy bulkhead until about 8" from the bottom and then curve away as shown on page 8-4 of the plans. Follow steps 1 through 5 in Q2BT39. Remove 1.5" of the canopy protective cover along the inside and outside edges. Place 2" wide duct tape overlapping the protective cover and the canopy edge. Don't curve the duct tape around the corners, but place several tapes on flat and then knife trim at the canopy edge. Now mark a line on the duct tape 0.7" along the front and sides and 1.1" along the rear of the canopy. Carefully remove the duct tape outside this line. This gives a very nice edge to later knife trim and the canopy frame tapes. Carefully cut through the fuselage shell along the front side of the upper seatback bulkhead, down to the bottom of the canopy frame. Place a 1/16" spacer onto the front of the seatback bulkhead. Install the aft canopy bulkhead with flox where it meets the canopy frame. Now flox the canopy in place. Wedge small nails into the canopy frame or bondo on wood blocks to hold the canopy down. Crawl through the bulkheads and radius the flox on the canopy/bulkhead joint. Put 3" two-ply BID tapes on the outside front and side canopy joint. Overlap the tapes 1/4" onto the duct tape on the canopy and knife trim. Use a sabre saw to cut out the canopy frame. Lay up the other glass tapes as per the plans.
You can order a PDF or printed copy of QuickTalk #7 by using the Q-talk Back Issue Order Page.