QuickTalk 3 - QUICKIE HINTS


- Details
- Category: Q-Talk Articles
- Published: Friday, 30 April 1982 07:11
- Written by Jim Masal
- Hits: 2456
From Ron Thornton, #1014-Canada
1. (Page 9-2) To install shoulder harness plates and gas drain plate, drill and tap BEFORE installing. After floxing into position, fill the hole with Vaseline to prevent epoxy flowing in. Lay glass over plates. Before glass is tacky, push toothpick through hole, withdraw leaving hole through glass. Use this hole as a guide to opening up the glass and expose the tapped hole in plate. This seemed easier than trying to drill and tap plate after it is glassed into position.
2. (Page 10-9) Dry fit elevator controls on canard before permanently installing. I didn't and wound up using a universal joint to correct a 1/4" misalignment in CSA8/CSA6/CS14.
3. (Large tire option) Those using the larger wheels should make LG10 wider than shown in order to avoid tire binding. Mine are 4-1/2", and one wheel still binds.
4. (Page 11-7) For brake spring C77, instead of making a 1" plate of .032 aluminum, I used a bolt with a hole drilled in the shaft with a large washer.
5. (Page 17-4) I could not tighten the engine mounts enough (the rubber mounts would "donut" from tightening and still the engine was sloppy). We made longer ESM1-1 inserts and used longer bolts and the engine is tight. Never cut the rubber mounts in order to tighten.
6. (Page 17-5) Just in case someone missed it, ignore drilling the engine shaft and installing the two AN4-22A bolts on the propeller installation. The prop is held on by a bolt through the center of the prop into the shaft.
7. (Page 17-5) The aluminum angles to mount the cowling will bend with use. I used stainless steel angle. Also, use two rivets to hold the angle to firewall to prevent them from turning. I installed Dzus fasteners instead of using nutplates and screws to hold cowling. They are satisfactory and a lot quicker to get the cowling off.
8. (Page 17-6) EB2, EB3 and EB4 must be TIGHT against the engine cooling fins. If necessary, silicone baffles to fins while installing.
From Jerry Zigler, #50
1. (Page 5-3) Vertical fin templates are attached after tip and root of fin are cut off at angles, not before.
2. (Page 7-2) Glass rear face of seatback bulkhead first. This will allow the wing to mount against a flat surface.
3. (Page 7-7) Sand seatback and tank bottom to proper angle to fit the contour of the fuselage bottom.
4. (Page 7-11) Bulkhead FU-89 should be used to jig the fuselage but should not be mounted permanently until the wing is fitted into position. This will prevent a possible mismatch between the wing center section and the available space between bulkheads.
5. (Page 7-12) Bulkhead FU-110 may be removed after the fuselage is glassed.
6. (Page 7-11) The fuselage aft top can be cut in half and then rejoined upon assembly to make it easier to install and to tape FU-153.7 in position.
7. (Page 7-13) Before any BID is applied to the fuselage, mark the 45-degree position of the cloth so you know the direction of the cloth before it is applied. Cut the cloth by holding the roll and positioning it one piece at a time over the fuselage at 45 degrees. Apply slurry by rolling up the glass on half of the fuselage, then drape cloth back down and wet it out. Do the same thing to the other half of the fuselage. You don't lose the orientation of your cloth if the locations are marked with a felt marker and it is held in position with push pins until it is wetted out.
8. (Page 4-4) To prevent mismatch, ES6 holes shouldn't be drilled until ready to mount engine assembly
From Neal Current, #399
1. (Page 7-7) To draw fuselage pattern on foam after marking points by plans dimensions, use a piece of 1/4" x 3/4" molding as a French curve. You can pin it to the foam with straight pins.
From Wayne Kilber, #17
1. (Page 15-1) I feel that making the canopy and instrument panel, as a unit is a mistake. It's flimsy. If (heaven forbid) you would lose a canopy, your instrument and electrical system would go. There you would be with no canopy, no instruments and NO POWER. I made my canopy cut just behind the instrument panel. (Ed. Note: We have had several builders write to say they are not satisfied in the results of a canopy/panel combination. A major objection also appears to be extra vibrations incurred by the instruments. Builders that are considering attaching their panel permanently to fuselage are reminded to think ahead as they perform Chapter 15.)
2. (Page 14-3) If you want the pivot of CSA-1 and CSA-2 to be at Sta. 50.0, you will have to mount the side console at Sta. 51.7 (see Page 7-9)
3. (Page 14-3, 14-4) I have interference between CS2 and the side console. Also be careful where you run your rudder cables so it doesn't interfere with CSA-3.
From Donald Parker, #68
1. In 18 hrs. of engine time and 7 hrs. of flying time, I have adjusted my valves 3 times. Am still checking.
From Jim Masal, #457
1. (Page 9-10) Tightening the lock nut on the back of CSM-3 can be maddening. Try putting CSM-3 in the chuck of a drill press, then tightening with an appropriate ratchet. You can also try putting the pin in a vise between two pieces of scrap aluminum to prevent scarring the surface as you tighten the nut down.
2. For those having trouble with WESTACH tachometers, a CARR tach was recommended at the Oshkosh '81 Quickie forum.
From Norman Sanford, #486
1. (Page 7-10) Make a jig for the bottom fuselage out of pine shelving to the same shape as the bottom of the fuselage sides. Results in perfect matchup when bottom and sides are joined. Better than using blocks as jigs as shown in the plans.
From Jim Stoveken, #204
1. Starting the Onan can be a big pain. We have found at 40 degrees and warmer, with throttle closed (and switch off), we snap the prop backward about six pulls. You can hear the engine sucking (if the throttle is closed all the way). Then switch on and prop forward. It works 90% of the time. In colder weather we use starting fluid (careful of the kick).
From Mike Conlin:
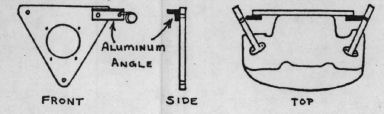
1. To keep from reworking right side console due to control tube interference -
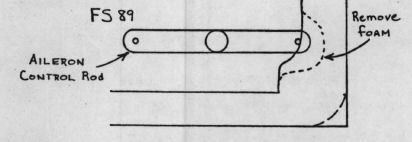
To prevent excessive vibration of exhaust pipes and possible cracking -
You can order a PDF or printed copy of QuickTalk #3 by using the Q-talk Back Issue Order Page.