Q2 Plans Chapter 13 Page 13-01
- Details
- Category: Q-2/Q-200 Plans
- Published: Thursday, 18 May 2006 09:05
- Written by Quickie Aircraft Corporation
- Hits: 5643
|
CANOPY ASSEMBLY AND MOUNTING INTRODUCTION
..... In this chapter, you will install the canopy that you previously mounted and cut out in Chapter 8. It is important to the passengers' safety to have a canopy that is strong, rigid, and securely fastened while in flight. Therefore, do not rush this section. FORWARD EDGE LAMINATION
..... Laminate 3 UNI across the front edge of the canopy, with the orientation across the front of the canopy. This lamination of 3 inch wide tapes will increase the stiffness and strength of the canopy at the forward edge. PROTECTING THE CANOPY PLEXIGLASS
..... The canopy was shipped to you with a protected coating applied on either side. You should be careful during construction that you do not remove this coating, exposing the canopy to scratches and abrasion. Once the aircraft is completely finished and painted, the coating may be peeled away in strips, exposing the canopy plexiglass itself. Whenever, you laminate onto the canopy surface, you will, however, need to remove the coating where the bond will take place. Protect the edge of canopy/lamination junction with grey tape. This will assist in providing a trim mask for knifetrimming. CANOPY FRAME STIFFENERS
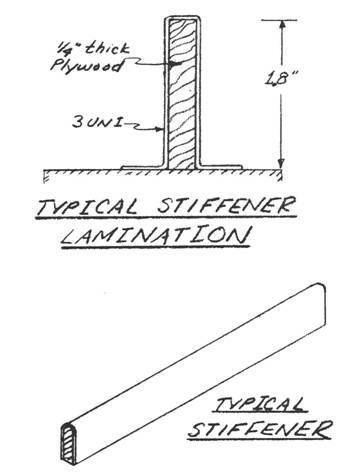
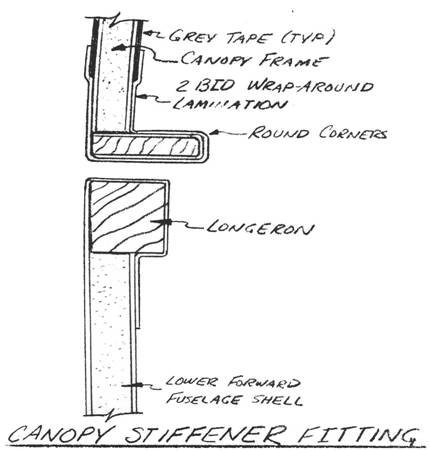
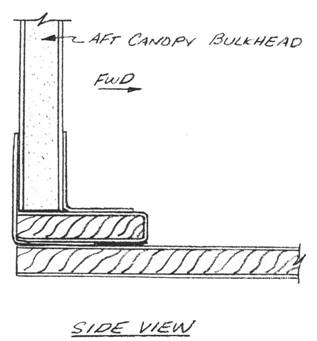
..... Three stiffeners will be fabricated. One each will be installed on each side of the canopy frame longitudinally, and the third will be installed transversly across the bottom of the aft canopy bulkhead. At the lower aft left and right points of the canopy frame, these three stiffeners join together. .....It is recommended that the core materials for these stiffeners be 1/4" thick plywood. An alternative is to use 1/4" thick white foam, but this alternative would require several plywood inserts for local beefup where bolts are inserted. .....As installed, each stiffener should be approximately 1.3" wide. Because the canopy frame sides are curved as they travel forward, those two stiffeners should be made about 1.8" wide to allow for fitting. The third stiffener, the one fitted to the aft canopy bulkhead, can be made 1.3" wide. .....To construct the stiffeners, cut three pieces of 1/4" plywood with the following sizes: 1.8" x 30", 1.8" X 30", and 1.3" x 44". Set them vertically on the jig table and hold them in place with a dab of 5-MIN on either end of each one. Round the top corners of the plywood so that the glass cloth will flow smoothly around the corners. Laminate 3 UNI with the orientation running lengthwise along the long dimension. The excess cloth that overlaps onto the table can be trimmed later.  ..... Once the laminations have cured, it is time to mount the stiffeners to the canopy frame. Begin by setting the canopy on the fuselage and checking the general fit of the canopy on the airframe. There should not be any trimming required for a good fit. .....The two stiffeners, one on each side, fit outboard.to the outside skin line as shown. This will require removing a portion of the canopy frame as indicated on the sketch. There should be an approximately 0.1" gap between the bottom of each stiffener and the top of the longeron, to allow the future insertion of a flexible seal to minimize air leaks. Each stiffener runs from the aft edge of the canopy forward as far as practical.  ..... To join each stiffener to the canopy frame, use a 2 BID wrap-around lamination from the inside skin of the frame to the outside skin of the frame, with an overlap onto the frame of a minimum of 0.7". Grey tape may be used as shown to provide a cleaner edge for trimming later. Flox is used where the stiffener meets the frame. .....The third stiffener is placed transversely at the aft canopy bulkhead. Ideally, this third stiffener should rest on the top of each side stiffener, and on the bottom of the aft canopy bulkhead. If necessary, a small piece of foam can be used to accomplish this. This third stiffener is likewise attached with flox and 2 BID tapes in a wrap-around configuration. .....When completed, these stiffeners will form a very rigid box around the canopy frame to stiffen up the entire assembly considerably, as we'll as provide hard mounting points for the hinges, pins, latches, etc.  |
||||
|
||||
PAGE
13-1 |
||||


